Notice Board

PatTakhaZOne Web Serf Education Purpose keh lhya ha. Jasa keh ap janty hein keh Takreeban 100% ma sa 90% patches, Craking tools or Hacking software mein virus hota ha.PatTakhaZOne peh har ek tool check kiya gya oR Trusted ha :) Ma Kud ek ek sofware Ko check Krka upload krta hon. Umeed ha apko meri posts pasand ahy gi.(Every SOftware is 100% Secure and Trusted) All information on this Blog is for educational purposes only.

Showing posts with label Blogging. Show all posts

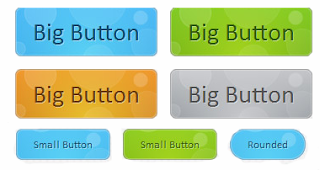
Add Stylish CSS Buttons For Blogger / website


Written explanation
1) Go to Blogger Dashboard → Template → Edit HTML.
2) Now Find the code shown below using [ctrl+F] (Use In HTML Box)
]]></b:skin>
3) Now Paste the Code Shown Below just Before it.
a.button-facebook,a.button-googleplus,a.button-linkedin,a.button-pinterest,a.button-rss,a.button-twitter {    -moz-border-radius: 3px;    -webkit-border-radius: 3px;    border-radius: 3px;    box-shadow: 0 1px 1px #999;    color: #fff;    display: inline-block;    font-size: 16px;    margin: 0 20px 20px 0;    padding: 10px 15px;    text-align: center;    width: 130px;    text-decoration:none;}a.button-facebook {    background-color: #2b4170; /* fallback color */    background: -moz-linear-gradient(top, #3b5998, #2b4170);    background: -ms-linear-gradient(top, #3b5998, #2b4170);    background: -webkit-linear-gradient(top, #3b5998, #2b4170);    border: 1px solid #2b4170;    text-shadow: 0 -1px -1px #1f2f52;}a.button-facebook:hover {    background: -moz-linear-gradient(top, #2b4170, #3b5998);    background: -ms-linear-gradient(top, #2b4170, #3b5998);    background: -webkit-linear-gradient(top, #2b4170, #3b5998);}a.button-googleplus {    background-color: #c33219; /* fallback color */    background: -moz-linear-gradient(top, #e64522, #c33219);    background: -ms-linear-gradient(top, #e64522, #c33219);    background: -webkit-linear-gradient(top, #e64522, #c33219);    border: 1px solid #c33219;    text-shadow: 0 -1px -1px #972412;}a.button-googleplus:hover {    background: -moz-linear-gradient(top, #c33219, #e64522);    background: -webkit-linear-gradient(top, #c33219, #e64522);}a.button-linkedin {    background-color: #0073b2; /* fallback color */    background: -moz-linear-gradient(top, #009cda, #0073b2);    background: -webkit-linear-gradient(top, #009cda, #0073b2);    border: 1px solid #0073b2;    text-shadow: 0 -1px -1px #005486;}a.button-linkedin:hover {    background: -moz-linear-gradient(top, #0073b2, #009cda);    background: -ms-linear-gradient(top, #0073b2, #009cda);    background: -webkit-linear-gradient(top, #0073b2, #009cda);}a.button-pinterest {    background-color: #a0171c; /* fallback color */    background: -moz-linear-gradient(top, #cb2027, #a0171c);    background: -ms-linear-gradient(top, #cb2027, #a0171c);    background: -webkit-linear-gradient(top, #cb2027, #a0171c);    border: 1px solid #a0171c;    text-shadow: 0 -1px -1px #761114;}a.button-pinterest:hover {    background: -moz-linear-gradient(top, #a0171c, #cb2027);    background: -ms-linear-gradient(top, #a0171c, #cb2027);    background: -webkit-linear-gradient(top, #a0171c, #cb2027);}a.button-rss {    background-color: #e2733d; /* fallback color */    background: -moz-linear-gradient(top, #e88845, #e2733d);    background: -ms-linear-gradient(top, #e88845, #e2733d);    background: -webkit-linear-gradient(top, #e88845, #e2733d);    border: 1px solid #e2733d;    text-shadow: 0 -1px -1px #9a4824;}a.button-rss:hover {    background: -moz-linear-gradient(top, #e2733d, #e88845);    background: -ms-linear-gradient(top, #e2733d, #e88845);    background: -webkit-linear-gradient(top, #e2733d, #e88845);}a.button-twitter {    background-color: #0081ce; /* fallback color */    background: -moz-linear-gradient(top, #00aced, #0081ce);    background: -ms-linear-gradient(top, #00aced, #0081ce);    background: -webkit-linear-gradient(top, #00aced, #0081ce);    border: 1px solid #0081ce;    text-shadow: 0 -1px -1px #005ea3;}a.button-twitter:hover {    background: -moz-linear-gradient(top, #0081ce, #00aced);    background: -ms-linear-gradient(top, #0081ce, #00aced);    background: -webkit-linear-gradient(top, #0081ce, #00aced);}
Using It in Your Posts
Use any 1 of the codes
Quote:
<a class="button-facebook" href="#">Cool World</a></div>
Quote:
<a class="button-googleplus" href="#">Cool World</a></div>
Quote:
<a class="button-twitter" href="#">Cool World</a></div>
Quote:
<a class="button-linkedin" href="#">Cool World</a></div>
Quote:
<a class="button-rss" href="#">Cool World</a></div>
Quote:
<a class="button-pinterest" href="#">Cool World</a></div>
Customize 
Replace Cool World with your own text. 
Change # to the desired link.
How To Add Round Shape Popular Posts Widget

How To Add Round Shape Popular Posts Widget


Written explanation
1) Go to Blogger Dashboard → Template → Edit HTML.
2) Now Find the code shown below using [ctrl+F] (Use In HTML Box) 
]]></b:skin>
3) Now Paste the Code Shown Below just Before it.
.popular-posts li,.popular-posts .item-content{float:left;display:inline;list-style:none;}
.popular-posts .item-snippet,.popular-posts .item-title,.feed-links{display:none;}p.description,aside li{font-size:12px;}.popular-posts ul li,.item-content,.item-thumbnail{margin:0!important;padding:0!important;}.sixcol,.left-main,.right-sidebar{width:50%;}
#PopularPosts1 img {background: none repeat scroll 0 0 #FFFFFF;border: 1px solid #CCCCCC;border-radius: 110px 110px 110px 110px;padding: 4px;}
4) Now Find the code shown below using [ctrl+F] (Use In HTML Box)
<b:widget id='PopularPosts1' locked='false' title='Popular Posts' type='PopularPosts'>⋯</b:widget>
5) You may/may not expand this code. All you have to do is replace the whole code with the code given below.
<b:widget id='PopularPosts1' locked='false' title='Popular Posts' type='PopularPosts'>
<b:includable id='main'>
  <b:if cond='data:title'><h2><data:title/></h2></b:if>
  <div class='widget-content popular-posts'>
    <ul>
      <b:loop values='data:posts' var='post'>
      <li>
        <b:if cond='data:showThumbnails == &quot;false&quot;'>
          <b:if cond='data:showSnippets == &quot;false&quot;'>
            <!-- (1) No snippet/thumbnail -->
            <a expr:href='data:post.href'><data:post.title/></a>
          <b:else/>
            <!-- (2) Show only snippets -->
            <div class='item-title'><a expr:href='data:post.href'><data:post.title/></a></div>
            <div class='item-snippet'><data:post.snippet/></div>
          </b:if>
        <b:else/>
          <b:if cond='data:showSnippets == &quot;false&quot;'>
            <!-- (3) Show only thumbnails -->
            <div class='item-thumbnail-only'>
              <b:if cond='data:post.thumbnail'>
                <div class='item-thumbnail'>
                  <a expr:href='data:post.href' target='_blank'>
                    <img alt='' border='0' expr:height='data:thumbnailSize' expr:src='data:post.thumbnail' expr:width='data:thumbnailSize'/>
                  </a>
                </div>
              </b:if>
              <div class='item-title'><a expr:href='data:post.href'><data:post.title/></a></div>
            </div>
            <div style='clear: both;'/>
          <b:else/>
            <!-- (4) Show snippets and thumbnails -->
            <div class='item-content'>
              <b:if cond='data:post.thumbnail'>
                <div class='item-thumbnail'>
                  <a expr:href='data:post.href' target='_blank'>
                    <img alt='' border='0' expr:height='data:thumbnailSize' expr:src='data:post.thumbnail' expr:width='data:thumbnailSize'/>
                  </a>
                </div>
              </b:if>
              <div class='item-title'><a expr:href='data:post.href'><data:post.title/></a></div>
              <div class='item-snippet'><data:post.snippet/></div>
            </div>
            <div style='clear: both;'/>
          </b:if>
        </b:if>
      </li>
      </b:loop>
    </ul>
    <b:include name='quickedit'/>
  </div>
</b:includable>
</b:widget>
6) Now save your template.

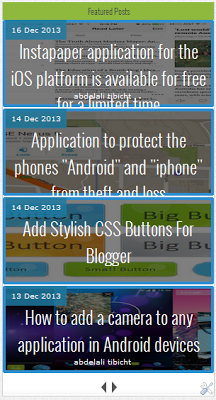
How To Add Featured Posts Slider Widget For Blogger


Written explanation 
 1) Go to Blogger Dashb0ard → Lay0ut → Page Elements.....
2) Add a HTML/JavaScript Gadget.....
3) Paste bel0w code in it..... 

<center>
<div id="headerbox">Featured Posts</div>
<div id="featuredpostside"></div>
<script src="http://ajax.googleapis.com/ajax/libs/jquery/1.8.0/jquery.min.js" type="text/javascript"></script>
<script src="https://dl.dropboxusercontent.com/u/76401970/All%20Blogger%20Tricks/abt-sidebar-slider.js" type="text/javascript"></script>
<script type='text/javascript'>
//<![CDATA[
FeaturedPostSide({
blogURL:"http://PattakhaZOne.blogspot.com/",
MaxPost:8,
idcontaint:"#featuredpostside",
ImageSize:300,
interval:5000,
autoplay:true,
tagName:false
});
//]]>
</script>
<link href='http://fonts.googleapis.com/css?family=Oswald:300' rel='stylesheet' type='text/css'/>
<style scoped="" type="text/css">
/*
Made by AllBloggerTricks.com with lot of hardwork please keep the comment intact
*/
ul.abt-sidebar-slider * {
    -moz-box-sizing: border-box;
}
ul.abt-sidebar-slider {
    font: 11px Verdana,Geneva,sans-serif;
}
ul.abt-sidebar-slider, ul.abt-sidebar-slider li {
    list-style: none outside none;
    margin: 0;
    padding: 0;
    position: relative;
}
ul.abt-sidebar-slider {
    height: 500px;
    width: 100%;
}
ul.abt-sidebar-slider li {
    display: none;
    float: left;
    height: 24.5%;
    overflow: hidden;
    padding: 0;
    position: absolute;
    width: 100%;
}
ul.abt-sidebar-slider li:nth-child(1), ul.abt-sidebar-slider li:nth-child(2), ul.abt-sidebar-slider li:nth-child(3), ul.abt-sidebar-slider li:nth-child(4) {
    display: block;
}
ul.abt-sidebar-slider li:nth-child(2) {
    left: 0;
    top: 50%;
}
ul.abt-sidebar-slider img {
    border: 0 none;
    height: 100%;
    width: 100%;
}
ul.abt-sidebar-slider .overlayx, ul.abt-sidebar-slider li {
    transition: all 0.4s ease-in-out 0s;
}
ul.abt-sidebar-slider li:nth-child(4) {
    left: 0;
    top: 75%;
    width: 100%;
}
ul.abt-sidebar-slider li:nth-child(3) {
    left: 0;
    top: 25%;
}
ul.abt-sidebar-slider .overlayx {
    background-color: rgba(0, 0, 0, 0.5);
    height: 100%;
    left: 0;
    position: absolute;
    top: 0;
    width: 100%;
    z-index: 2;
}
ul.abt-sidebar-slider .overlayx, ul.abt-sidebar-slider img {
    border: 4px solid #2E8DCE;
    border-radius: 3px 3px 3px 3px;
}
ul.abt-sidebar-slider .overlayx:hover {
    opacity: 0.1;
}
ul.abt-sidebar-slider h4 {
    color: white;
    font-family: Oswald;
    font-size: 25px;
    font-weight: 100;
    line-height: 1.5em;
    margin: 0;
    padding: 0 10px;
    position: absolute;
    top: 25px;
    width: 100%;
    z-index: 2;
}
ul.abt-sidebar-slider .label_text {
    bottom: 10px;
    color: white;
    font-size: 90%;
    left: 10px;
    position: absolute;
    z-index: 2;
}
ul.abt-sidebar-slider li:nth-child(2) .autname, ul.abt-sidebar-slider li:nth-child(3) .autname {
    display: none;
}
.buttons {
    margin: 5px 0 0;
}
.buttons a {
    display: inline-block;
    height: 25px;
    position: relative;
    text-indent: -9999px;
    width: 15px;
}
.buttons a:before {
    border-color: transparent #535353 transparent transparent;
    border-style: solid;
    border-width: 8px 7px;
    content: "";
    height: 0;
    left: 50%;
    margin-left: -10px;
    margin-top: -8px;
    position: absolute;
    top: 50%;
    width: 0;
}
.buttons a.nextx:before {
    border-color: transparent transparent transparent #535353;
    margin-left: -3px;
}
.date {
    background: none repeat scroll 0 0 rgba(32, 122, 161, 0.84);
    bottom: 93px;
    padding: 8px;
    position: relative;
    right: 6px;
}
#headerbox {
    background: #8FB93D;
    font-family: Oswald;
    padding: 4px;
}
</style>
</center>

4) Customize y0ur setting. Find any w0rd click F3 or Ctrl+F.
    Replace it URL HERE with your  URL.
 5) Save y0ur Widget.

Add Beautiful Animated Lavalamp Menu for Blogger


Step 1 : Adding CSS to Template


Written explanation
1) Go to Blogger Dashboard → Template → Edit HTML.
2) Now Find the code shown below using [ctrl+F] (Use In HTML Box)  
]]></b:skin>
3) Now Paste the Code Shown Below just Before it.
#coolworld-nav,#coolworld-nav ul {
    list-style: none outside none;
    margin: 0;
    padding: 0;
}
#coolworld-nav {
    background: url('https://lh3.googleusercontent.com/-njAX-XszMS0/UrbEt-GR-VI/AAAAAAAACKA/2BG9m1qFBg4/w961-h58-no/Coolworl.in.png') no-repeat scroll 0 0 transparent;
    clear: both;
    font-size: 12px;
    height: 58px;
    padding: 0 0 0 9px;
    position: relative;
    width: 100%;
}
#coolworld-nav ul {
    background-color: #222;
    border:1px solid #222;
    border-radius: 0 5px 5px 5px;
    border-width: 0 1px 1px;
    box-shadow: 0 5px 5px rgba(0, 0, 0, 0.5);
    left: -9999px;
    overflow: hidden;
    position: absolute;
    top: -9999px;
    z-index: 2;

    -moz-transform: scaleY(0);
    -ms-transform: scaleY(0);
    -o-transform: scaleY(0);
    -webkit-transform: scaleY(0);
    transform: scaleY(0);

    -moz-transform-origin: 0 0;
    -ms-transform-origin: 0 0;
    -o-transform-origin: 0 0;
    -webkit-transform-origin: 0 0;
    transform-origin: 0 0;

    -moz-transition: -moz-transform 0.1s linear;
    -ms-transition: -ms-transform 0.1s linear;
    -o-transition: -o-transform 0.1s linear;
    -webkit-transition: -webkit-transform 0.1s linear;
    transition: transform 0.1s linear;
}
#coolworld-nav li {
    background: url('https://lh5.googleusercontent.com/-FAxhkCWpvmI/UrbEc91HO4I/AAAAAAAACJs/JI8cOMisx0g/w2-h49-no/Coolworl.in.png') no-repeat scroll right 5px transparent;
    float: left;
    position: relative;
}
#coolworld-nav li a {
    color: #FFFFFF;
    display: block;
    float: left;
    font-weight: normal;
    height: 30px;
    padding: 23px 20px 0;
    position: relative;
    text-decoration: none;
    text-shadow: 1px 1px 1px #000000;
}
#coolworld-nav li:hover > a {
    color: #00B4FF;
}
#coolworld-nav li:hover, #coolworld-nav a:focus, #coolworld-nav a:hover, #coolworld-nav a:active {
    background: none repeat scroll 0 0 #121212;
    outline: 0 none;
}
#coolworld-nav li:hover ul.subs {
    left: 0;
    top: 53px;
    width: 180px;

    -moz-transform: scaleY(1);
    -ms-transform: scaleY(1);
    -o-transform: scaleY(1);
    -webkit-transform: scaleY(1);
    transform: scaleY(1);
}
#coolworld-nav ul li {
    background: none;
    width: 100%;
}
#coolworld-nav ul li a {
    float: none;
}
#coolworld-nav ul li:hover > a {
    background-color: #121212;
    color: #00B4FF;
}
#lavalamp {
    background: url('https://lh5.googleusercontent.com/-Z7hCS-rEro8/UrbEEx7jvvI/AAAAAAAACJY/Wrz2Hvl4tIk/w64-h16-no/Coolworl.in.png') no-repeat scroll 0 0 transparent;
    height: 16px;
    left: 13px;
    position: absolute;
    top: 0px;
    width: 64px;

    -moz-transition: all 300ms ease;
    -ms-transition: all 300ms ease;
    -o-transition: all 300ms ease;
    -webkit-transition: all 300ms ease;
    transition: all 300ms ease;
}
#lavalamp:hover {
    -moz-transition-duration: 3000s;
    -ms-transition-duration: 3000s;
    -o-transition-duration: 3000s;
    -webkit-transition-duration: 3000s;
    transition-duration: 3000s;
}
#coolworld-nav li:nth-of-type(1):hover ~ #lavalamp {
    left: 13px;
}
#coolworld-nav li:nth-of-type(2):hover ~ #lavalamp {
    left: 90px;
}
#coolworld-nav li:nth-of-type(3):hover ~ #lavalamp {
    left: 170px;
}
#coolworld-nav li:nth-of-type(4):hover ~ #lavalamp {
    left: 250px;
}
#coolworld-nav li:nth-of-type(5):hover ~ #lavalamp {
    left: 330px;
}
#coolworld-nav li:nth-of-type(6):hover ~ #lavalamp {
    left: 410px;
}
#coolworld-nav li:nth-of-type(7):hover ~ #lavalamp {
    left: 490px;
}
#coolworld-nav li:nth-of-type(8):hover ~ #lavalamp {
    left: 565px;
}
4) Now save your template.

Step 2 : Add Widget to your blog 

1) Go to Blogger Dashboard → Layout → Page Elements.
2) Add a HTML/JavaScript Gadget.
3) Paste below code in it.
<ul id="coolworld-nav">
<li><a href="#">Home</a></li>
<li><a class="hsubs" href="#">Menu 1</a>
<ul class="subs">
<li><a href="#">Submenu 1</a></li>
<li><a href="#">Submenu 2</a></li>
<li><a href="#">Submenu 3</a></li>
<li><a href="#">Submenu 4</a></li>
<li><a href="#">Submenu 5</a></li>
</ul>
</li>
<li><a class="hsubs" href="#">Menu 2</a>
<ul class="subs">
<li><a href="#">Submenu 2-1</a></li>
<li><a href="#">Submenu 2-2</a></li>
<li><a href="#">Submenu 2-3</a></li>
<li><a href="#">Submenu 2-4</a></li>
<li><a href="#">Submenu 2-5</a></li>
<li><a href="#">Submenu 2-6</a></li>
<li><a href="#">Submenu 2-7</a></li>
<li><a href="#">Submenu 2-8</a></li>
</ul>
</li>
<li><a class="hsubs" href="#">Menu 3</a>
<ul class="subs">
<li><a href="#">Submenu 3-1</a></li>
<li><a href="#">Submenu 3-2</a></li>
<li><a href="#">Submenu 3-3</a></li>
<li><a href="#">Submenu 3-4</a></li>
<li><a href="#">Submenu 3-5</a></li>
</ul>
</li>
<li><a href="#">Menu 4</a></li>
<li><a href="#">Menu 5</a></li>
<li><a href="#">Menu 6</a></li>
<div id="lavalamp"></div>
</ul>
4) Customize your setting.Find any word click F3 or Ctrl+F
Replace # with the links.
Replace Menu , Submenu with your link text which you want to appear on the menu. 
5) Save your Widget. Don't forget to add the widget on the Center place.

How To Add Popular Posts Widget for Blogger


Written explanation 
1) Go to Blogger Dashboard → Layout → Page Elements → add a Popular Posts Widget.
2) Change the settings of Popular post and unchecked mark snippet And Images thumbnail.

Customizing Popular Posts
3) Go to Blogger Dashboard → Template → Edit HTML.
4) Now Find the code shown below using [ctrl+F] (Use In HTML Box)

]]></b:skin>

5) Now Paste the Code Shown Below just Before it.

.popular-posts ul li a {
    background: none repeat scroll 0 0 #DDDDDD;
    color: #444444;
    display: block;
    margin: 0 0 0.5em;
    padding: 0.4em;
    position: relative;
    text-decoration: none;
    transition: all 0.3s ease-out 0s;
}
.popular-posts ul li a:before {
    background: none repeat scroll 0 0 #CCCCCC;
    font-weight: 700;
    height: 2em;
    left: -2.5em;
    line-height: 2em;
    margin-top: -1em;
    position: absolute;
    text-align: center;
    top: 50%;
    width: 2em;
}
.popular-posts ul li a:after {
    border: 0.5em solid transparent;
    content: "";
    left: -1em;
    margin-top: -0.5em;
    position: absolute;
    top: 50%;
    transition: all 0.3s ease-out 0s;
}
.popular-posts ul li a:hover {
    background: none repeat scroll 0 0 #CCCCCC;
}
.popular-posts ul li a:hover:after {
    border-left-color: #CCCCCC;
    left: -0.5em;
}
.popular-posts ul li:first-child + li + li + li + li + li + li + li + li + li a:before{content:"10"}
.popular-posts ul li:first-child + li + li + li + li + li + li + li + li a:before{content:"9"}
.popular-posts ul li:first-child + li + li + li + li + li + li + li a:before{content:"8"}
.popular-posts ul li:first-child + li + li + li + li + li + li a:before{content:"7"}
.popular-posts ul li:first-child + li + li + li + li + li a:before{content:"6"}
.popular-posts ul li:first-child + li + li + li + li a:before{content:"5"}
.popular-posts ul li:first-child + li + li + li a:before{content:"4"}
.popular-posts ul li:first-child + li + li a:before{content:"3"}
.popular-posts ul li:first-child + li a:before{content:"2"}
.popular-posts ul li:first-child a:before{content:"1"}

6) Now save your template.

Add Metro Style Sharing Widget For Blogger

How to add links social sites  Facebook and Twitter and Google Plus as well as links feed of your site in the form of Metro wonderful , and is characterized by a wonderful and attractive and stylish and her aesthetic form attract the eyes of all visitors to your site as a site professionally.

These buttons phased approach being developed in the new addition by adding the codes of HTML so wonderful sites.

Written explanation
 1) Go to Blogger Dashboard → LayoutPage Elements.
2) Add a HTML/JavaScript Gadget.
3) Paste below code in it


<center>
<style>
.seconds{
text-align:right;
color:#000;
font-size:10px;
}
.supportive a:active{position:relative;top:1px}
.widget-item-control a{display:none;}
    .widget-item-control a{display:none;}
    #supportive{width: 300px;
    float: left;margin-top: 10px;}
    #supportive li{position:relative; cursor:pointer; padding: 0 !important;}
    #supportive .facebook, .googleplus, .rss, .twitter{
    position: relative;
    -moz-transition: all 0.4s ease-in-out;
    -webkit-transition: all 0.4s ease-in-out;
    -o-transition: all 0.4s ease-in-out;
    transition: all 0.4s ease-in-out;
    z-index: 5;
    display: block;
    float: left;
    margin: 1px;}
    #supportive .icon{}
    #supportive .facebook{width: 147px;
    height: 150px;
    background: rgba(59,89,152,1) url("http://4.bp.blogspot.com/-31bTtaWMriY/UpMM1ZsQ9vI/AAAAAAAABr8/4No4wPxF5RQ/s1600/facebook.png") no-repeat center center;}
    #supportive .twitter{width: 148px;
    height: 74px;
    background: rgba(59,89,152,1) url("http://3.bp.blogspot.com/--BC13sDY0LA/UpMNF6M7MiI/AAAAAAAABsA/T8n76aUg224/s1600/Twitter.png") no-repeat center center;}
    #supportive .googleplus{width: 148px;
    height: 74px;
    background: rgba(59,89,152,1) url("http://3.bp.blogspot.com/-Xx2DcvMTtSw/UpMNQPbjLmI/AAAAAAAABsI/O5plF0PVQ-w/s1600/google+plus.png") no-repeat center center;}
    #supportive .rss{ width: 299px;
    height: 74px;
    background: rgba(59,89,152,1) url("http://4.bp.blogspot.com/-KK0vroZgrpM/UpMNbRSr5BI/AAAAAAAABsQ/MJwspnmxTIU/s1600/rss.png") no-repeat center center;}
    #supportive li:hover .facebook{background-color:#3468B6;-moz-transition: all 0.1s ease-in-out;
-webkit-transform: rotate(-10deg);
     -moz-transform: rotate(-10deg);
       -o-transform: rotate(-10deg);
      -ms-transform: rotate(-10deg);
          transform: rotate(-10deg);
    -webkit-transition: all 0.1s ease-in-out;}
    #supportive li:hover .twitter{background:rgba(64,153,255,1) url("http://3.bp.blogspot.com/--BC13sDY0LA/UpMNF6M7MiI/AAAAAAAABsA/T8n76aUg224/s1600/Twitter.png") no-repeat center center;-moz-transition: all 0.1s ease-in-out;
    -webkit-transition: all 0.1s ease-in-out;}
    #supportive li:hover .googleplus{background:rgba(228,69,36,1) url("http://3.bp.blogspot.com/-Xx2DcvMTtSw/UpMNQPbjLmI/AAAAAAAABsI/O5plF0PVQ-w/s1600/google+plus.png") no-repeat center center;-moz-transition: all 0.1s ease-in-out;
    -webkit-transition: all 0.1s ease-in-out;}
    #supportive li:hover .rss{background:rgba(255,102,0,1) url("http://4.bp.blogspot.com/-KK0vroZgrpM/UpMNbRSr5BI/AAAAAAAABsQ/MJwspnmxTIU/s1600/rss.png") no-repeat center center;-moz-transition: all 0.1s ease-in-out;
    -webkit-transition: all 0.1s ease-in-out;}
</style>
<ul id='supportive'>
<li><a class='icon facebook' href='http://www.facebook.com/USERNAME3' target='_blank'></a></li>
<li><a class='icon twitter' href='http://twitter.com/USERNAME2' target='_blank'></a></li>
<li><a class='icon googleplus' href='G+ URL' target='_blank'></a></li>
<li><a class='icon rss' href='http://feeds.feedburner.com/USERNAME1' target='_blank'></a></li>
<div class="seconds">
<a href="http://pattakhazone.blogspot.com/" target='_blank'>Get This</a>
</div></ul></center>

4) Customize your setting.Find any word click F3 or Ctrl+F.

Replace it USERNAME1 with your Feedburner Username.

Replace it USERNAME2 with your Twitter Username.

Replace it USERNAME3 with your Facebook Username.

Replace it G+ URL with your Google+ Page url .

5) Save your Widget.

Add New Subscribe Box For Blogger


Add Subscribe by email professionally add very fantastic  Because they contain important features. additions to add one which saves you look at all the add-on unit as it does not take a great deal of coordination Blog Therefore, this addendum is considered important for all bloggers and developers.

Written explanation 

 1) Go to Blogger Dashboard → Layout Page Elements.
2) Add a HTML/JavaScript Gadget.
3) Paste below code in it


<style type='text/css'>
#sidebar-subscribe-box{background:#9df !important;padding:3px 0;margin-top:-6px;
margin-bottom:-17px;}
.sidebar-subscribe-box-wrapper{
background-color:#93d1ea;
background: url(http://4.bp.blogspot.com/-VMnDX-3GLQs/UpL4y8d_5tI/AAAAAAAABqE/9-QZSslLwdo/s1600/mail_s.png) right 20px no-repeat;color:#fff;
text-shadow: 0px 1px 1px rgba(0,0,0,0.3);
line-height:20px;
padding:1px 20px 10px;text-align:left;}
.sidebar-subscribe-box-form{clear:both;display:block;margin:10px 0}
form.sidebar-subscribe-box-form{clear:both;display:block;margin:10px 0 0;width:auto}
.sidebar-subscribe-box-email-field{-moz-border-radius:4px;-webkit-border-radius:4px;background:#fff url(http://4.bp.blogspot.com/-gPvq4PbxmZ4/UpL48r-4HvI/AAAAAAAABqM/2A1qIvek8jA/s1600/sprites.png) no-repeat 0 -27px;border:1px solid #ccc;border-radius:4px;color:#444;margin:0 0 15px;padding:10px 40px;width:48%;margin-right:-3px;}
.sidebar-subscribe-box-email-button{
box-shadow:none!important;
margin-left:8px;
border-radius: 6px;
width:40px !important;
background:#333;
color:#fff;
cursor:pointer;
font-family:verdana;
font-weight:700;
padding:10px;text-shadow:1px 1px 0 rgba(0,0,0,.4);text-transform:uppercase;
padding-left:10px;padding-left:1px}
.sidebar-subscribe-box-email-button:hover,.sidebar-subscribe-box-email-button:focus{background:#333}.sidebar-subscribe-box-email-button:active{iframe,object,embed,.yt-border iframe,.yt-border object,.yt-border embed,table{width:20%}embed{border-radius:3px;background:#FFF;border:1px solid #ddd;margin:0;padding:4px 4px 4px}#footer-section{background:#f5f5f5 url(https://lh3.googleusercontent.com/-Q0JQ01dCnLY/UpL5HSyPshI/AAAAAAAABqU/f4IvN-3XevI/h120/bg-pattern.png) repeat top left;border-top:1px solid #aaa;font-family:cambria;font-size:14px;height:100px;margin:10px -30px 5px;padding:0 30px;text-align:center;width:100%}
.border_b {
background: url(http://themes.presslayer.com/Place/wp-content/themes/Place/images/mail_border.png)repeat-x;
z-index:1;
}
.top-border{
margin-bottom:-100px;
}
</style>
<div class="top-border">
<img src="http://1.bp.blogspot.com/-S53e5kkd09M/UpL5TKpusUI/AAAAAAAABqc/UaXHfmUMqgw/s1600/mail_border.png" width="100%" height="3"/>
</div>
<div id="sidebar-subscribe-box"><div class="sidebar-subscribe-box-wrapper">
<br/>
<p><font size="5">Newsletter</font></p>
<br/>
<p>Sign up to receive email updates and to hear what's going on with our company!</p>
<br/>
<div class="sidebar-subscribe-box-form"><form action="http://feedburner.google.com/fb/a/mailverify?uri=USERNAME1" class="sidebar-subscribe-box-form" method="post" onsubmit="window.open('http://feedburner.google.com/fb/a/mailverify?uri=USERNAME1', 'popupwindow', 'scrollbars=yes,width=550,height=520');return true" target="popupwindow"><input name="uri" type="hidden" value="USERNAME1'" /><input name="loc" type="hidden" value="en_US" /><input class="sidebar-subscribe-box-email-field" name="email" autocomplete="off" placeholder="Your email address :)"/><input class="sidebar-subscribe-box-email-button" title="" type="submit" value="OK" /></form></div></div>
</div>
<img src="http://3.bp.blogspot.com/-O6tKZHu2qyE/UpL5dN70jXI/AAAAAAAABqk/PGNobylJkTc/s1600/mail_border+(1).png" width="100%" height="3"/>

4) Customize your setting.Find any word click F3 or Ctrl+F
Replace it USERNAME1 with your Feedburner Username. 
5) Save your Widget.

How to add a beautifull search box to your Blog


So go to:
Blogger=====>Layout=========>add a gadget======>choose HTML/JAVA SCRIPT and add this code right here :
(Remark: you can change the color of those search boxes using this site that gives you all hex color codes so enjoy it : http://hex-color.com)

<style>
#search-box {
position: relative;
width: 100%;
margin: 0;
}

#search-form
{
height: 40px;
border: 1px solid #999;
-webkit-border-radius: 5px;
-moz-border-radius: 5px;
border-radius: 5px;
background-color: #fff;
overflow: hidden;
}
#search-text
{
font-size: 14px;
color: #ddd;
border-width: 0;
background: transparent;
}

#search-box input[type="text"]
{
width: 90%;
padding: 11px 0 12px 1em;
color: #333;
outline: none;
}

#search-button {
position: absolute;
top: 0;
right: 0;
height: 42px;
width: 80px;
font-size: 14px;
color: #fff;
text-align: center;
line-height: 42px;
border-width: 0;
background-color: #4d90fe;
-webkit-border-radius: 0px 5px 5px 0px;
-moz-border-radius: 0px 5px 5px 0px;
border-radius: 0px 5px 5px 0px;
cursor: pointer;
}
</style>

<div id='search-box'>
<form action='/search' id='search-form' method='get' target='_top'>
<input id='search-text' name='q' placeholder='Search TechFrost' type='text'/>
<button id='search-button' type='submit'><span>Search</span></button>
</form>
</div>

Add Beautiful Metro style Menu Guide For Blogger

Today's lesson is a gift for each site gawkers NEWTH3 Informatics, and is a way to create a list of the horizontal sections are quite similar to the list of Metro introduced by Windows 8 and add it to your blog Blogger.


Written explanation
Step 1 : Adding CSS to Template
  1) Go to Blogger Dashboard → Template → Edit HTML.
2) Now Find the code shown below using [ctrl+F] (Use In HTML Box)  
   
]]></b:skin>
3) Now Paste the Code Shown Below just Before it.
/*===MBL METRO UI Menu==*/

body {
 font-family:sans-serif;
}
a {
 text-decoration:none;
}
.mblmetromenu {
 width:960px;
 margin:auto;
}
@media screen and (max-width:960px) {
 .mblmetromenu {
 width:100%;
 }
}

/* MblMetroMenu */
.MblMetroMenu {
 position:relative;
}
.om-nav {
 position:absolute;
 width:100%;
 z-index:999;
 display:none;
}
.om-ctrlbar {
 width:100%;
 height:48px;
}
.om-ctrlitems {
 margin:auto;
 padding:0px;
 height:48px;
 display:inline-block;
 text-align:center;
}
.om-ctrlitem {
 height:48px;
 width:48px;
 display:none;
 cursor:pointer;
 float:left;
 opacity:0.5;
 -ms-filter: "progid: DXImageTransform.Microsoft.Alpha(Opacity=50)" !important;
 filter: alpha(opacity=50) !important; /* For IE8 and earlier */ }
.om-ctrlitem:hover {
 opacity:0.8;
 -ms-filter: "progid: DXImageTransform.Microsoft.Alpha(Opacity=80)" !important;
 filter: alpha(opacity=80) !important; /* For IE8 and earlier */ }
.om-activectrlitem {
 opacity:1 !important;
 -ms-filter: "progid: DXImageTransform.Microsoft.Alpha(Opacity=100)" !important;
 filter: alpha(opacity=100) !important; /* For IE8 and earlier */ }
.om-controlitems {
 width:960px;
 margin:auto;
}
.om-controlitem {
 height:48px;
 cursor:pointer;
}
.om-closenav {
 float:left;
}
.om-movenext {
 float:right;
}
.om-itemholder {
 margin:auto;
 padding:20px 0px;
}
@media screen and (max-width:960px) {
 .om-closenav {
  position:absolute;
  z-index:9999;
  left:0;
  top:0;
 }
 .om-movenext {
  position:absolute;
  z-index:9999;
  right:0;
  top:0;
 }
 .om-controlitems {
  width:100%;
 }
 .om-itemholder {
  width:100%;
 }
 }
.om-centerblock {
 display:inline-block;
}
.om-item {
 display:none;
}
.om-showitem {
 margin:5px;
 float:left;
 display:none;
}
/* END MblMetroMenu */

/* TILE BUTTONS */
/* Standar Buttons */
.tile-bt {
 text-align:center;
 cursor:pointer;
 width:90px;
 height:90px;
}
.tile-bt a {
 display:block;
 padding-top:12px;
 text-decoration: !important;
}
.tile-bt img {
 margin:0 auto 0 auto;
 padding-bottom:5px;
 height:48px;
 width:48px;
 position:relative;
 display:block;
}
.tile-bt span {
 font-size:12px;
 padding-bottom:10px;
 display:block;
}
.tile-bt:active {
 opacity:0.5;
}
/* End Standard Buttons */


/* Large Buttons */
.tile-bt-large {
 width:190px;
 height:90px;
 line-height:90px;
 text-align:center;
 cursor:pointer;
}
.tile-bt-large a {
 display:block;
 text-decoration: !important;
}
.tile-bt-large img {
 vertical-align: middle;
 margin:auto;
 padding:0px;
 position:relative;
 width:48px;
 height:48px;
}
.tile-bt-large span {
 vertical-align: middle;
 display:inline;
}
.tile-bt-large:active {
 opacity:0.5;
}
/* End Large Buttons */
/* Extralarge Buttons */
.tile-bt-extralarge {
 text-align:center;
 cursor:pointer;
 width:190px;
 height:190px;
}
.tile-bt-extralarge a {
 display:block;
 padding-top:52px;
 text-decoration: !important;
}
.tile-bt-extralarge img {
 margin:0 auto 0 auto;
 padding-bottom:22px;
 height:80px;
 width:80px;
 position:relative;
 display:block;
}
.tile-bt-extralarge span {
 font-size:14px;
 padding-bottom:20px;
 display:block;
}
.tile-bt-extralarge:active {
 opacity:0.5;
}
/* End Extralarge Buttons */

/* END TILE BUTTONS */

/* SHADOW LIST */
.shadow-white, .shadow-black, .shadow-blue, .shadow-green, .shadow-red {
 /*display:inline-block;*/
}
.shadow-white:hover {
 box-shadow:0px 0px 6px 3px #fff;
 -webkit-box-shadow:0px 0px 6px 3px #fff;
 -moz-box-shadow:0px 0px 6px 3px #fff;
 -o-box-shadow:0px 0px 6px 3px #fff;
 -ms-box-shadow:0px 0px 6px 3px #fff;
}
.shadow-blue:hover {
 box-shadow:0px 0px 6px 3px #38D1F7;
 -webkit-box-shadow:0px 0px 6px 3px #38D1F7;
 -moz-box-shadow:0px 0px 6px 3px #38D1F7;
 -o-box-shadow:0px 0px 6px 3px #38D1F7;
 -ms-box-shadow:0px 0px 6px 3px #38D1F7;
}
.shadow-green:hover {
 box-shadow:0px 0px 6px 3px #AACA37;
 -webkit-box-shadow:0px 0px 6px 3px #AACA37;
 -moz-box-shadow:0px 0px 6px 3px #AACA37;
 -o-box-shadow:0px 0px 6px 3px #AACA37;
 -ms-box-shadow:0px 0px 6px 3px #AACA37;
}
.shadow-red:hover {
 box-shadow:0px 0px 6px 3px #E81750;
 -webkit-box-shadow:0px 0px 6px 3px #E81750;
 -moz-box-shadow:0px 0px 6px 3px #E81750;
 -o-box-shadow:0px 0px 6px 3px #E81750;
 -ms-box-shadow:0px 0px 6px 3px #E81750;
}
.shadow-black:hover {
 box-shadow:0px 0px 6px 3px #444;
 -webkit-box-shadow:0px 0px 6px 3px #444;
 -moz-box-shadow:0px 0px 6px 3px #444;
 -o-box-shadow:0px 0px 6px 3px #444;
 -ms-box-shadow:0px 0px 6px 3px #444;
}
/* END SHADOW LIST */
/* BACKGROUND LIST */
/* Solid Colors */
.solid-blue { background:#00BBE2; }
.solid-blue-2 { background:#2C84EE; }
.solid-darkblue { background:#044E94; }
.solid-violetred { background:#781766; }
.solid-red { background:#E51400;}
.solid-red-2 { background:#E81750; }
.solid-pink { background:#FF539B; }
.solid-purple { background:#D02090; }
.solid-orange { background:#FB8F02; }
.solid-orange-2 { background:#FF6600; }
.solid-orange-3 { background:#DD5F37; }
.solid-coral { background:#CD5B45; }
.solid-green { background:#67B239; }
.solid-green-2 {background:#96BF01; }
.solid-darkgreen { background:#016C38; }
.solid-olive { background:#999900}
.solid-grass { background:#CDCD00; }
.solid-darkred { background:#5F0000; }
.solid-gold { background:#FEE9AE; }
.solid-yellow { background:#F7D100; }
.solid-black { background:#000; }
.solid-smoke { background:#F5F5F5; }
/* End Solid Colors */

/* MISC */
.clearspace { clear: both; }
.floatleft { float:left; }
.floatright { float:right; }
.none { display: none !important; width:0px !important; }
.light-text {
 color:#fff;
}
.dark-text {
 color:#1e1e1e;
}
.gradient {
 background: -moz-linear-gradient(-45deg,  rgba(255,255,255,0) 0%, rgba(255,255,255,0.3) 100%); /* FF3.6+ */
 background: -webkit-gradient(linear, left top, right bottom, color-stop(0%,rgba(255,255,255,0)), color-stop(100%,rgba(255,255,255,0.3))); /* Chrome,Safari4+ */
 background: -webkit-linear-gradient(-45deg,  rgba(255,255,255,0) 00%,rgba(255,255,255,0.3) 100%); /* Chrome10+,Safari5.1+ */
 background: -o-linear-gradient(-45deg,  rgba(255,255,255,0) 0%,rgba(255,255,255,0.3) 100%); /* Opera 11.10+ */
 background: -ms-linear-gradient(-45deg,  rgba(255,255,255,0) 0%,rgba(255,255,255,0.3) 100%); /* IE10+ */
 background: linear-gradient(-45deg,  rgba(255,255,255,0) 0%,rgba(255,255,255,0.3) 100%); /* W3C */
}
.margin-5 { margin:5px; }
4) Now save your template.
Step 2 : Add Widget to your blog
1) Go to Blogger Dashboard → Layout → Page Elements.
2) Add a HTML/JavaScript Gadget.
3) Paste below code in it.
<!-- metromenu -->
<div class="metromenu">
<div data-navid="om-nav" class="tile-bt-extralarge solid-violetred shadow-black margin-5 floatleft metromenu">
<a href="#" class="gradient">
<img src="https://lh6.googleusercontent.com/-envqsAeXv7I/UsaZ-f5lGLI/AAAAAAAACak/KKQe3eLnVzE/s128-no/Coolworld.in.png" alt="" />
<span class="light-text">Homepage</span>
</a>
</div>

<div data-navid="om-nav" class="tile-bt-large solid-coral shadow-red margin-5 floatleft metromenu">
<a href="#" class="gradient">
<img src="https://lh5.googleusercontent.com/-phZsF-nWvOc/UsaaSutVZmI/AAAAAAAACa4/JRm0KCvlR8M/s128-no/Coolworld.in.png" alt="" />
<span class="light-text">About US</span>
</a>
</div>

<div data-navid="om-nav2" class="tile-bt solid-purple shadow-blue margin-5 floatleft metromenu">
<a href="#" class="gradient">
<img src="https://lh3.googleusercontent.com/-nQLFt07dHCU/Usaaf6Z2YpI/AAAAAAAACbM/-9PYF7lAMnk/s128-no/Coolworld.in.png" alt="" />
<span class="light-text">Rss Feeds</span>
</a>
</div>

<div data-navid="om-nav" class="tile-bt-large solid-red shadow-red margin-5 floatleft metromenu">
<a href="#" class="gradient">
<img src="https://lh5.googleusercontent.com/-_KQq8P1rtJs/Usaat2f4PdI/AAAAAAAACbg/Uc51LXtHeaM/s128-no/Coolworld.in.png" alt="" />
<span class="light-text">Search</span>
</a>
</div>

<div data-navid="om-nav2" class="tile-bt solid-darkred shadow-red margin-5 floatleft metromenu">
<a href="#" class="gradient">
<img src="https://lh3.googleusercontent.com/-ZJDuWuS9648/Usaa9j73W5I/AAAAAAAACb0/XC95mHnIiPU/s128-no/Coolworld.in.png" alt="" />
<span class="light-text">Contact US</span>
</a>
</div>

<div data-navid="om-nav2" class="tile-bt solid-black shadow-black margin-5 floatleft metromenu">
<a href="#" class="gradient">
<img src="https://lh4.googleusercontent.com/-WnlHYSIMJd8/UsabMBMInYI/AAAAAAAACcI/stvGNDTVhwc/s128-no/Coolworld.in.png" alt="" />
<span class="light-text">Get HELP</span>
</a>
</div>

<div data-navid="om-nav2" class="tile-bt solid-orange shadow-black margin-5 floatleft metromenu">
<a href="#" class="gradient">
<img src="https://lh3.googleusercontent.com/-ClFTRP9K3OE/UsabZ-aC4nI/AAAAAAAACcc/iMY_MGwYiM0/s128-no/Coolworld.in.png" alt="" />
<span class="light-text">YouTube</span>
</a>
</div>

<div data-navid="om-nav2" class="tile-bt solid-darkblue shadow-blue margin-5 floatleft metromenu">
<a href="#" class="gradient">
<img src="https://lh3.googleusercontent.com/-rBCRpXc7X-I/UsabmYGk19I/AAAAAAAACcw/x1XK6dQHaLk/s128-no/Coolworld.in.png" alt="" />
<span class="light-text">Facebook</span>
</a>
</div>

<div data-navid="om-nav" class="tile-bt-large solid-blue shadow-blue margin-5 floatleft metromenu">
<a href="#" class="gradient">
<img src="https://lh6.googleusercontent.com/-1YNj39W1cbQ/Usab3jWosgI/AAAAAAAACdE/trPpP0nQ4tA/s128-no/Coolworld.in.png" alt="" />
<span class="light-text">Photos</span>
</a>
</div>

<div data-navid="om-nav2" class="tile-bt solid-olive shadow-green margin-5 floatleft metromenu">
<a href="#" class="gradient">
<img src="https://lh5.googleusercontent.com/-LgocZN_7jKo/UsacG4V49wI/AAAAAAAACdY/nP-cbDO6mlk/s128-no/Coolworld.in.png" alt="" />
<span class="light-text">Music</span>
</a>
</div>
<!-- End metromenu -->
</div>
<!-- END metromenu -->
4) Customize your setting.Find any word click F3 or Ctrl+F
Replace # with the links. 
Replace Menu with your link text which you want to appear on the menu. 
5) Save your Widget.Don't forget to add the widget on the Center place.